Rich web application on pure Java with Vaadin and Quarkus
29 April 2020
Recently I wrote about REST API with Eclipse Microprofile and Quarkus - and it is very useful for the microservices development, but from time to time every backend Java developer needs for the UI. With Vaadin web framework you can write UI 100% in Java without getting bogged down in JS, HTML, and CSS.
Quarkus provides Servlet and Websocket support as well, so there is no any blockers to run web application.
To bootstrap Quarkus from the scratch you can visit code.quarkus.io and select build tool you like and extensions you need. In our case we need for:
- Undertow Servlet
- Undertow WebSockets
With Vaadin 8 dependencies my build.gradle looks pretty clear:
plugins {
    id 'java'
    id 'io.quarkus'
}
repositories {
     mavenLocal()
     mavenCentral()
}
dependencies {
    compile 'com.vaadin:vaadin-server:8.10.3'
    compile 'com.vaadin:vaadin-push:8.10.3'
    compile 'com.vaadin:vaadin-client-compiled:8.10.3'
    compile 'com.vaadin:vaadin-themes:8.10.3'
    implementation 'io.quarkus:quarkus-undertow-websockets'
    implementation 'io.quarkus:quarkus-undertow'
    implementation enforcedPlatform("${quarkusPlatformGroupId}:${quarkusPlatformArtifactId}:${quarkusPlatformVersion}")
}

group 'org.kostenko'
version '1.0.0-SNAPSHOT'

compileJava {
    options.encoding = 'UTF-8'
    options.compilerArgs << '-parameters'
}
Now we able to create com.vaadin.ui.UI
@Theme("dashboard")
public class MyUI extends UI {

    @Override
    protected void init(VaadinRequest vaadinRequest) {
      ...
    }

    /**
     * VaadinServlet configuration
     */
    @WebServlet(urlPatterns = "/*", name = "MyUIServlet", asyncSupported = true, initParams = {
        @WebInitParam(name = "org.atmosphere.websocket.suppressJSR356", value = "true")}
    )
    @VaadinServletConfiguration(ui = MyUI.class, productionMode = false)
    public static class MyUIServlet extends VaadinServlet {
    }
}
Put Vaadin static files to the /src/main/resources/META-INF/resources/VAADIN and run quarkus in dev mode as usual ./gradlew quarkusDev:
Listening for transport dt_socket at address: 5005
__  ____  __  _____   ___  __ ____  ______
 --/ __ \/ / / / _ | / _ \/ //_/ / / / __/
 -/ /_/ / /_/ / __ |/ , _/ ,< / /_/ /\ \
--\___\_\____/_/ |_/_/|_/_/|_|\____/___/
2020-04-29 09:49:37,718 WARN  [io.qua.dep.QuarkusAugmentor] (main) Using Java versions older than 11 to build Quarkus applications is deprecated and will be disallowed in a future release!
2020-04-29 09:49:38,389 INFO  [io.und.servlet] (Quarkus Main Thread) Initializing AtmosphereFramework
2020-04-29 09:49:38,579 INFO  [io.quarkus] (Quarkus Main Thread) Quarkus 1.4.1.Final started in 0.995s. Listening on: http://0.0.0.0:8080
2020-04-29 09:49:38,579 INFO  [io.quarkus] (Quarkus Main Thread) Profile dev activated. Live Coding activated.
2020-04-29 09:49:38,579 INFO  [io.quarkus] (Quarkus Main Thread) Installed features: [cdi, servlet, undertow-websockets]
2020-04-29 09:49:46,423 WARNING [com.vaa.ser.DefaultDeploymentConfiguration] (executor-thread-1)
=================================================================
Vaadin is running in DEBUG MODE.
Add productionMode=true to web.xml to disable debug features.
To show debug window, add ?debug to your application URL.
=================================================================
Example application I did based on vaadin/dashboard-demo that uses nicely looking and responsive Valo theme
Current solution limitations and workaround:
- Latest Vaadin version (14+) does not work from the box and needs for custom Quarkus extensions like moewes/quarkus-vaadin-lab and there is still no official one :(
- Vaadin CDI doesn't work as expected, so to access your CDI beans from the UI components you should use
CDI.current().select(Bean.class).get(); - By default Quarkus removes CDI beans from the runtime if no one @Inject them. Use
io.quarkus.arc.Unremovableannotation for keep beans you need. - In case
java.lang.IllegalStateException:Unable to configure jsr356 at that stage. ServerContainer is null- provideorg.atmosphere.websocket.suppressJSR356VaadinServlet parameter as was shown in the code snippet above - Quarkus native mode doesn't work
Described example application source code available on GitHub
Load huge amount of data with Jakarta EE Batch
25 March 2020
Processing huge amount of data is a challenge for every enterprise system. Jakarta EE specifications provides useful approach to get it done through Jakarta Batch (JSR-352):
Batch processing is a pervasive workload pattern, expressed by a distinct application organization and execution model. It is found across virtually every industry, applied to such tasks as statement generation, bank postings, risk evaluation, credit score calculation, inventory management, portfolio optimization, and on and on. Nearly any bulk processing task from any business sector is a candidate for batch processing.
Batch processing is typified by bulk-oriented, non-interactive, background execution. Frequently long-running, it may be data or computationally intensive, execute sequentially or in parallel, and may be initiated through various invocation models, including ad hoc, scheduled, and on-demand.
Batch applications have common requirements, including logging, checkpointing, and parallelization. Batch workloads have common requirements, especially operational control, which allow for initiation of, and interaction with, batch instances; such interactions include stop and restart.
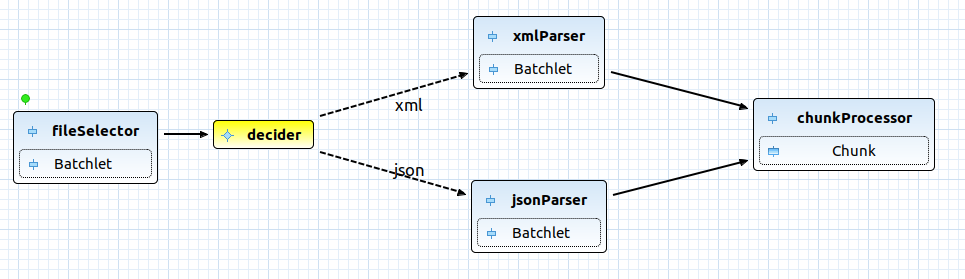
One of the typical use case is a import data from different sources and formats to internal database. Below we will design sample application to import data, for example, from json and xml files to the database and see how well structured it can be.
Using Eclipse Red Hat CodeReady Studio plugin, we can easily design our solution diagram:
Jakarta Batch descriptor in this case will looks like:
META-INF/batch-jobs/hugeImport.xml:
<?xml version="1.0" encoding="UTF-8"?>
<job id="hugeImport" xmlns="http://xmlns.jcp.org/xml/ns/javaee" xmlns:xsi="http://www.w3.org/2001/XMLSchema-instance" xsi:schemaLocation="http://xmlns.jcp.org/xml/ns/javaee http://xmlns.jcp.org/xml/ns/javaee/jobXML_1_0.xsd" version="1.0">
    <step id="fileSelector" next="decider">
        <batchlet ref="fileSelectorBatchlet">
            <properties>
                <property name="path" value="/tmp/files2import"/>
            </properties>
        </batchlet>
    </step>
    <decision id="decider" ref="myDecider">
        <next on="xml" to="xmlParser"/>
        <next on="json" to="jsonParser"/>
    </decision>
    <step id="xmlParser" next="chunkProcessor">
        <batchlet ref="xmlParserBatchlet"/>
    </step>
    <step id="jsonParser" next="chunkProcessor">
        <batchlet ref="jsonParserBatchlet"/>
    </step>
    <step id="chunkProcessor">
        <chunk>
            <reader ref="itemReader"/>
            <processor ref="itemMockProcessor"/>
            <writer ref="itemJpaWriter"/>
        </chunk>
        <partition>
            <plan partitions="5"></plan>
        </partition>
    </step>
</job>
So, now we need to implement each brick above and try to keep each batchlet independent as much as possible. As you can see from above our sample job consist from:
- fileSelector - batchlet do file selection based on supported by configuration file extension
- decider - decision maker, responsible for choosing right parser
- xml\jsonParser - parser batchlets, responsible for file parsing to a list of items
- chunkProcessor - items processing chunk(reader, optional processor and writer) with partitioning to boost performance
Before start with implementation, let's design useful solution to share state between steps. Unfortunately, Jakarta Batch Specification does not provide job scoped CDI beans yet (JBeret implementation does, specification doesn't). But we able to use JobContext.set\getTransientUserData() to deal with the current batch context. In our case we want to share File and Queue with items for processing:
@Named
public class ImportJobContext {
    @Inject
    private JobContext jobContext;

    private Optional<File> file = Optional.empty();
    private Queue<ImportItem> items = new ConcurrentLinkedQueue<>();

    public Optional<File> getFile() {
        return getImportJobContext().file;
    }
    public void setFile(Optional<File> file) {
        getImportJobContext().file = file;
    }
    public Queue<ImportItem> getItems() {
        return getImportJobContext().items;
    }

    private ImportJobContext getImportJobContext() {
        if (jobContext.getTransientUserData() == null) {
            jobContext.setTransientUserData(this);
        }
        return (ImportJobContext) jobContext.getTransientUserData();
    }
}
Now we can inject our custom ImportJobContext to share type-safe state between batchlets. First step is search file for processing by provided in step properties path:
@Named
public class FileSelectorBatchlet extends AbstractBatchlet {

    @Inject
    private ImportJobContext jobContext;

    @Inject
    @BatchProperty
    private String path;

    @Override
    public String process() throws Exception {
        Optional<File> file = Files.walk(Paths.get(path)).filter(Files::isRegularFile).map(Path::toFile).findAny();
        if (file.isPresent()) {
            jobContext.setFile(file);
        }
        return BatchStatus.COMPLETED.name();
    }
}
After we need to make decision about parser, for example, based on extension. Decider just returns file extension as string and then batch runtime should give control to the corresponding parser batchlet. Please, check <decision id="decider" ref="myDecider"> section in the XML batch descriptor above.
@Named
public class MyDecider implements Decider {

    @Inject
    private ImportJobContext jobContext;

    @Override
    public String decide(StepExecution[] ses) throws Exception {
        if (!jobContext.getFile().isPresent()) {
            throw new FileNotFoundException();
        }
        String name = jobContext.getFile().get().getName();
        String extension = name.substring(name.lastIndexOf(".")+1);
        return extension;
    }
}
ParserBatchlet in turn should parse file using JSON-B or JAXB depends on type and fill Queue with ImportItem objects. I would like to use ConcurrentLinkedQueue to share items between partitions, but if you need for some other behavior here, you can provide javax.batch.api.partition.PartitionMapper with your own implementation
@Named
public class JsonParserBatchlet  extends AbstractBatchlet {

    @Inject
    ImportJobContext importJobContext;

    @Override
    public String process() throws Exception {

        List<ImportItem> items = JsonbBuilder.create().fromJson(
                new FileInputStream(importJobContext.getFile().get()),
                new ArrayList<ImportItem>(){}.getClass().getGenericSuperclass());

        importJobContext.getItems().addAll(items);
        return BatchStatus.COMPLETED.name();
    }
}
ItemReader then will looks as simple as possible, just pool item from the Queue:
@Named
public class ItemReader  extends AbstractItemReader {

    @Inject
    ImportJobContext importJobContext;

    @Override
    public ImportItem readItem() throws Exception {

        return importJobContext.getItems().poll();
    }
}
And persist time...
@Named
public class ItemJpaWriter  extends AbstractItemWriter  {

    @PersistenceContext
    EntityManager entityManager;

    @Override
    public void writeItems(List<Object> list) throws Exception {
        for (Object obj : list) {
            ImportItem item = (ImportItem) obj;
            entityManager.merge(item);
        }
    }
}
Actually, this is it! Now we able to easily extend our application with new parsers, processors and writers without any existing code changes, - just describe new (update existing) flows over Jakarta Batch descriptor.
Of course, Jakarta Batch specification provides much more helpful functionality than i have covered in this post (Checkpoints, Exception Handling, Listeners, Flow Control, Failed job restarting etc.), but even it enough to see how simple, power and well structured it can be.
Note! Wildfly Application Server implements Jakarta Batch specification through the batch-jberet subsystem. By default last one configured to use only 10 threads.
<subsystem xmlns="urn:jboss:domain:batch-jberet:2.0">
    ...
    <thread-pool name="batch">
        <max-threads count="10"/>
        <keepalive-time time="30" unit="seconds"/>
    </thread-pool>
</subsystem>
So, if you are planing intensive usage of Batch runtime - feel free to increase this parameter:
/subsystem=batch-jberet/thread-pool=batch/:write-attribute(name=max-threads, value=100)
Described sample application source code available on GitHub
Slow SQL logging with JPA and Wildfly
20 March 2020
Recently I wrote about Logging for JPA SQL queries with Wildfly. In this post I'll show you how to configure logging for slow SQL queries.
Wildfly uses Hibernate as JPA provider. So, to enable slow sql feature you just need to provide hibernate.session.events.log.LOG_QUERIES_SLOWER_THAN_MS property in your persistence.xml :
<properties>
    ...
    <property name="hibernate.session.events.log.LOG_QUERIES_SLOWER_THAN_MS" value="25"/>
    ...
</properties>
To log slow queries to separate file, please configure logging like:
/subsystem=logging/periodic-rotating-file-handler=slow_sql_handler:add(level=INFO, file={"path"=>"slowsql.log"}, append=true, autoflush=true, suffix=.yyyy-MM-dd,formatter="%d{yyyy-MM-dd HH:mm:ss,SSS}")
/subsystem=logging/logger=org.hibernate.SQL_SLOW:add(use-parent-handlers=false,handlers=["slow_sql_handler"])
Note!
Described above functionality available since Hibernate version 5.4.5, but latest for today Wildfly 19 uses Hibernate version 5.3. Fortunately, if you can't wait to enjoy the latest version of Hibernate, you can use WildFly feature packs to create a custom server with a different version of Hibernate ORM in few simple steps:
Create provisioning configuration file (provision.xml)
<server-provisioning xmlns="urn:wildfly:server-provisioning:1.1" copy-module-artifacts="true">
    <feature-packs>
	<feature-pack
		groupId="org.hibernate"
		artifactId="hibernate-orm-jbossmodules"
		version="${hibernate-orm.version}" />
	<feature-pack
		groupId="org.wildfly"
		artifactId="wildfly-feature-pack"
		version="${wildfly.version}" />
    </feature-packs>
</server-provisioning>
Create gradle build file (build.gradle)
plugins {
  id "org.wildfly.build.provision" version '0.0.6'
}
repositories {
    mavenLocal()
    mavenCentral()
    maven {
        name 'jboss-public'
        url 'https://repository.jboss.org/nexus/content/groups/public/'
    }
}
provision {
    //Optional destination directory:
    destinationDir = file("wildfly-custom")

    //Update the JPA API:
    override( 'org.hibernate.javax.persistence:hibernate-jpa-2.1-api' ) {
        groupId = 'javax.persistence'
        artifactId = 'javax.persistence-api'
        version = '2.2'
    }
    configuration = file( 'provision.xml' )
    //Define variables which need replacing in the provisioning configuration!
    variables['wildfly.version'] = '17.0.0.Final'
    variables['hibernate-orm.version'] = '5.4.5.Final'
}
Build custom Wildfly version
gradle provision
Switch to a different Hibernate ORM slot in your persistence.xml
<properties>
    <property name="jboss.as.jpa.providerModule" value="org.hibernate:5.4"/>
</properties>
Enjoy!
Firebase push notifications with Eclipse Microprofile Rest Client
05 March 2020
Nowadays Push notifications is a must have feature for any trend application. Firebase Cloud Messaging (FCM) is a free (at least in this moment) cross-platform solution for messages and notifications for Android, iOS and Web applications.
To enable push notification on client side you should create Firebase project and follow the manual or examples. From the server side perspective all you need to send push notification is:
- Server key - will be created for your firebase project
- Instance ID token - id of specific subscribed instance (instance destination id)
Firebase provides https://fcm.googleapis.com/fcm/send endpoint and very simple HTTP API like
{
    "to": "<Instance ID token>",
    "notification": {
      "title": "THIS IS MP REST CLIENT!",
      "body": "The quick brown fox jumps over the lazy dog."
      }
}
So, let's design simple Microprofile REST client to deal with above:
@Path("/")
@RegisterRestClient(configKey = "push-api")
public interface PushClientService {

    @POST
    @Path("/fcm/send")
    @Produces("application/json")
    @ClientHeaderParam(name = "Authorization", value = "{generateAuthHeader}")
    void send(PushMessage msg);

    default String generateAuthHeader() {
        return "key=" + ConfigProvider.getConfig().getValue("firebase.server_key", String.class);
    }
}
public class PushMessage {

    public String to;
    public PushNotification notification;

    public static class PushNotification {
        public String title;
        public String body;
    }
}
and application.properties
# firebase server key
firebase.server_key=<SERVER_KEY>
# rest client
push-api/mp-rest/url=https://fcm.googleapis.com/
Actually, this is it! Now you able to @Inject PushClientService and enjoy push notifications as well.
@Inject
@RestClient
PushClientService pushService;
...
pushService.send(message);
If you would like to test how it works from client side perspective, - feel free to use Test web application to generate instance ID token and check notifications delivery.
Described sample application source code with swagger-ui endpoint and firebase.server_key available on GitHub
Well secured and documented REST API with Eclipse Microprofile and Quarkus
20 February 2020
Eclipse Microprofile specification provides several many helpful sections about building well designed microservice-oriented applications. OpenAPI, JWT Propagation and JAX-RS - the ones of them.

To see how it works on practice let's design two typical REST resources: insecured token to generate JWT and secured user, based on Quarkus Microprofile implementation.
Easiest way to bootstrap Quarkus application from scratch is generation project structure by provided starter page - code.quarkus.io. Just select build tool you like and extensions you need. In our case it is:
- SmallRye JWT
- SmallRye OpenAPI
I prefer gradle, - and my build.gradle looks pretty simple
group 'org.kostenko'
version '1.0.0'
plugins {
    id 'java'
    id 'io.quarkus'
}
repositories {
     mavenLocal()
     mavenCentral()
}
dependencies {
    implementation 'io.quarkus:quarkus-smallrye-jwt'
    implementation 'io.quarkus:quarkus-smallrye-openapi'
    implementation 'io.quarkus:quarkus-resteasy-jackson'
    implementation 'io.quarkus:quarkus-resteasy'
    implementation enforcedPlatform("${quarkusPlatformGroupId}:${quarkusPlatformArtifactId}:${quarkusPlatformVersion}")
    testImplementation 'io.quarkus:quarkus-junit5'
    testImplementation 'io.rest-assured:rest-assured'
}
compileJava {
    options.compilerArgs << '-parameters'
}
Now we are ready to improve standard JAX-RS service with OpenAPI and JWT stuff:
@RequestScoped
@Path("/user")
@Consumes(MediaType.APPLICATION_JSON)
@Produces(MediaType.APPLICATION_JSON)
@Tags(value = @Tag(name = "user", description = "All the user methods"))
@SecurityScheme(securitySchemeName = "jwt", type = SecuritySchemeType.HTTP, scheme = "bearer", bearerFormat = "jwt")
public class UserResource {

    @Inject
    @Claim("user_name")
    Optional<JsonString> userName;

    @POST
    @PermitAll
    @Path("/token/{userName}")
    @APIResponses(value = {
        @APIResponse(responseCode = "400", description = "JWT generation error"),
        @APIResponse(responseCode = "200", description = "JWT successfuly created.", content = @Content(schema = @Schema(implementation = User.class)))})
    @Operation(summary = "Create JWT token by provided user name")
    public User getToken(@PathParam("userName") String userName) {
        User user = new User();
        user.setJwt(TokenUtils.generateJWT(userName));
        return user;
    }

    @GET
    @RolesAllowed("user")
    @Path("/current")
    @SecurityRequirement(name = "jwt", scopes = {})
    @APIResponses(value = {
        @APIResponse(responseCode = "401", description = "Unauthorized Error"),
        @APIResponse(responseCode = "200", description = "Return user data", content = @Content(schema = @Schema(implementation = User.class)))})
    @Operation(summary = "Return user data by provided JWT token")
    public User getUser() {
        User user = new User();
        user.setName(userName.get().toString());
        return user;
    }
}
First let's take a brief review of used Open API annotations:
@Tags(value = @Tag(name = "user", description = "All the user methods"))- Represents a tag. Tag is a meta-information you can use to help organize your API end-points.@SecurityScheme(securitySchemeName = "jwt", type = SecuritySchemeType.HTTP, scheme = "bearer", bearerFormat = "jwt")- Defines a security scheme that can be used by the operations.@APIResponse(responseCode = "401", description = "Unauthorized Error")- Corresponds to the OpenAPI response model object which describes a single response from an API Operation.@Operation(summary = "Return user data by provided JWT token")- Describes an operation or typically a HTTP method against a specific path.@Schema(implementation = User.class)- Allows the definition of input and output data types.
To more details about Open API annotations, please refer to the MicroProfile OpenAPI Specification.
After start the application, you will able to get your Open API description in the .yaml format by the next URL http://0.0.0.0:8080/openapi or even enjoy Swagger UI as well by http://0.0.0.0:8080/swagger-ui/ :
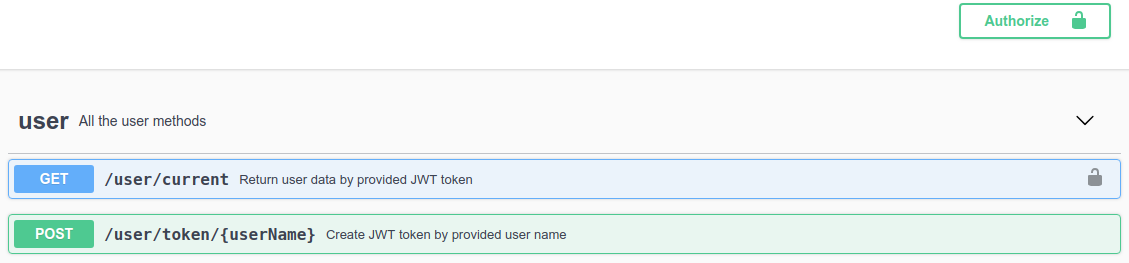
Note By default swagger-ui available in the dev mode only. If you would like to keep swagger on production, - add next property to your application.properties
quarkus.swagger-ui.always-include=true
Second part of this post is a JWT role based access control(RBAC) for microservice endpoints. JSON Web Tokens are an open, industry standard RFC 7519 method for representing claims securely between two parties and below we will see how easy it can be integrated in your application with Eclipse Microprofile.
As JWT suggests usage of cryptography - we need to generate public\private key pair before start coding:
# Generate a private key
openssl genpkey -algorithm RSA -out private_key.pem -pkeyopt rsa_keygen_bits:2048

# Derive the public key from the private key
openssl rsa -pubout -in private_key.pem -out public_key.pem
Now we are able to generate JWT and sign data with our private key in the, for example, next way:
public static String generateJWT(String userName) throws Exception {

    Map<String, Object> claimMap = new HashMap<>();
    claimMap.put("iss", "https://kostenko.org");
    claimMap.put("sub", "jwt-rbac");
    claimMap.put("exp", currentTimeInSecs + 300)
    claimMap.put("iat", currentTimeInSecs);
    claimMap.put("auth_time", currentTimeInSecs);
    claimMap.put("jti", UUID.randomUUID().toString());
    claimMap.put("upn", "UPN");
    claimMap.put("groups", Arrays.asList("user"));
    claimMap.put("raw_token", UUID.randomUUID().toString());
    claimMap.put("user_bane", userName);

    return Jwt.claims(claimMap).jws().signatureKeyId("META-INF/private_key.pem").sign(readPrivateKey("META-INF/private_key.pem"));
}
For additional information about JWT structure, please refer https://jwt.io
Time to review our application security stuff:
@RequestScoped - It is not about security as well. But as JWT is request scoped we need this one to work correctly;
@PermitAll - Specifies that all security roles are allowed to invoke the specified method;
@RolesAllowed("user") - Specifies the list of roles permitted to access method;
@Claim("user_name") - Allows us inject provided by JWT field;
To configure JWT in your application.properties, please add
quarkus.smallrye-jwt.enabled=true
mp.jwt.verify.publickey.location=META-INF/public_key.pem
mp.jwt.verify.issuer=https://kostenko.org

# quarkus.log.console.enable=true
# quarkus.log.category."io.quarkus.smallrye.jwt".level=TRACE
# quarkus.log.category."io.undertow.request.security".level=TRACE
And actually that is it, - if you try to reach /user/current service without or with bad JWT token in the Authorization header - you will get HTTP 401 Unauthorized error.
curl example:
curl -X GET "http://localhost:8080/user/current" -H "accept: application/json" -H "Authorization: Bearer eyJraWQiOiJNRVRBLUlORi9wcml2YXRlX2tleS5wZW0iLCJ0eXAiOiJKV1QiLCJhbGciOiJSUzI1NiJ9.eyJzdWIiOiJqd3QtcmJhYyIsInVwbiI6IlVQTiIsInJhd190b2tlbiI6IjQwOWY3MzVkLTQyMmItNDI2NC1iN2UyLTc1YTk0OGFjMTg3MyIsInVzZXJfbmFtZSI6InNlcmdpaSIsImF1dGhfdGltZSI6MTU4MjE5NzM5OSwiaXNzIjoiaHR0cHM6Ly9rb3N0ZW5rby5vcmciLCJncm91cHMiOlsidXNlciJdLCJleHAiOjkyMjMzNzIwMzY4NTQ3NzU4MDcsImlhdCI6MTU4MjE5NzM5OSwianRpIjoiMzNlMGMwZjItMmU0Yi00YTczLWJkNDItNDAzNWQ4NTYzODdlIn0.QteseKKwnYJWyj8ccbI1FuHBgWOk98PJuN0LU1vnYO69SYiuPF0d9VFbBada46N_kXIgzw7btIc4zvHKXVXL5Uh3IO2v1lnw0I_2Seov1hXnzvB89SAcFr61XCtE-w4hYWAOaWlkdTAmpMSUt9wHtjc0MwvI_qSBD3ol_VEoPv5l3_W2NJ2YBnqkY8w68c8txL1TnoJOMtJWB-Rpzy0XrtiO7HltFAz-Gm3spMlB3FEjnmj8-LvMmoZ3CKIybKO0U-bajWLPZ6JMJYtp3HdlpsiXNmv5QdIq1yY7uOPIKDNnPohWCgOhFVW-bVv9m-LErc_s45bIB9djwe13jFTbNg"
Source code of described sample application available on GitHub