Well secured and documented REST API with Eclipse Microprofile and Quarkus
20 February 2020
Eclipse Microprofile specification provides several many helpful sections about building well designed microservice-oriented applications. OpenAPI, JWT Propagation and JAX-RS - the ones of them.

To see how it works on practice let's design two typical REST resources: insecured token to generate JWT and secured user, based on Quarkus Microprofile implementation.
Easiest way to bootstrap Quarkus application from scratch is generation project structure by provided starter page - code.quarkus.io. Just select build tool you like and extensions you need. In our case it is:
- SmallRye JWT
- SmallRye OpenAPI
I prefer gradle, - and my build.gradle looks pretty simple
group 'org.kostenko'
version '1.0.0'
plugins {
    id 'java'
    id 'io.quarkus'
}
repositories {
     mavenLocal()
     mavenCentral()
}
dependencies {
    implementation 'io.quarkus:quarkus-smallrye-jwt'
    implementation 'io.quarkus:quarkus-smallrye-openapi'
    implementation 'io.quarkus:quarkus-resteasy-jackson'
    implementation 'io.quarkus:quarkus-resteasy'
    implementation enforcedPlatform("${quarkusPlatformGroupId}:${quarkusPlatformArtifactId}:${quarkusPlatformVersion}")
    testImplementation 'io.quarkus:quarkus-junit5'
    testImplementation 'io.rest-assured:rest-assured'
}
compileJava {
    options.compilerArgs << '-parameters'
}
Now we are ready to improve standard JAX-RS service with OpenAPI and JWT stuff:
@RequestScoped
@Path("/user")
@Consumes(MediaType.APPLICATION_JSON)
@Produces(MediaType.APPLICATION_JSON)
@Tags(value = @Tag(name = "user", description = "All the user methods"))
@SecurityScheme(securitySchemeName = "jwt", type = SecuritySchemeType.HTTP, scheme = "bearer", bearerFormat = "jwt")
public class UserResource {

    @Inject
    @Claim("user_name")
    Optional<JsonString> userName;

    @POST
    @PermitAll
    @Path("/token/{userName}")
    @APIResponses(value = {
        @APIResponse(responseCode = "400", description = "JWT generation error"),
        @APIResponse(responseCode = "200", description = "JWT successfuly created.", content = @Content(schema = @Schema(implementation = User.class)))})
    @Operation(summary = "Create JWT token by provided user name")
    public User getToken(@PathParam("userName") String userName) {
        User user = new User();
        user.setJwt(TokenUtils.generateJWT(userName));
        return user;
    }

    @GET
    @RolesAllowed("user")
    @Path("/current")
    @SecurityRequirement(name = "jwt", scopes = {})
    @APIResponses(value = {
        @APIResponse(responseCode = "401", description = "Unauthorized Error"),
        @APIResponse(responseCode = "200", description = "Return user data", content = @Content(schema = @Schema(implementation = User.class)))})
    @Operation(summary = "Return user data by provided JWT token")
    public User getUser() {
        User user = new User();
        user.setName(userName.get().toString());
        return user;
    }
}
First let's take a brief review of used Open API annotations:
@Tags(value = @Tag(name = "user", description = "All the user methods"))- Represents a tag. Tag is a meta-information you can use to help organize your API end-points.@SecurityScheme(securitySchemeName = "jwt", type = SecuritySchemeType.HTTP, scheme = "bearer", bearerFormat = "jwt")- Defines a security scheme that can be used by the operations.@APIResponse(responseCode = "401", description = "Unauthorized Error")- Corresponds to the OpenAPI response model object which describes a single response from an API Operation.@Operation(summary = "Return user data by provided JWT token")- Describes an operation or typically a HTTP method against a specific path.@Schema(implementation = User.class)- Allows the definition of input and output data types.
To more details about Open API annotations, please refer to the MicroProfile OpenAPI Specification.
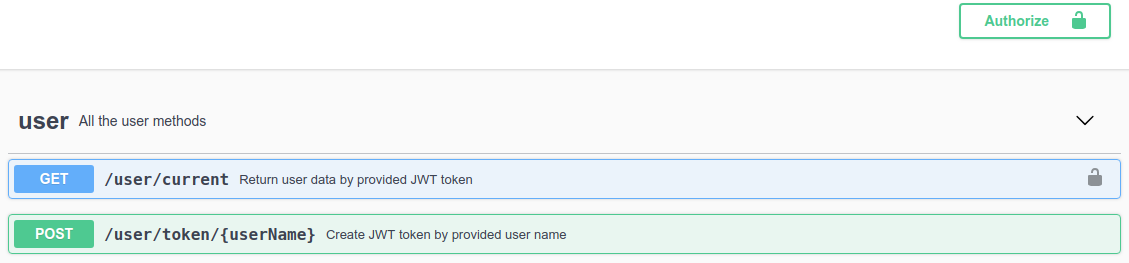
After start the application, you will able to get your Open API description in the .yaml format by the next URL http://0.0.0.0:8080/openapi or even enjoy Swagger UI as well by http://0.0.0.0:8080/swagger-ui/ :
Note By default swagger-ui available in the dev mode only. If you would like to keep swagger on production, - add next property to your application.properties
quarkus.swagger-ui.always-include=true
Second part of this post is a JWT role based access control(RBAC) for microservice endpoints. JSON Web Tokens are an open, industry standard RFC 7519 method for representing claims securely between two parties and below we will see how easy it can be integrated in your application with Eclipse Microprofile.
As JWT suggests usage of cryptography - we need to generate public\private key pair before start coding:
# Generate a private key
openssl genpkey -algorithm RSA -out private_key.pem -pkeyopt rsa_keygen_bits:2048

# Derive the public key from the private key
openssl rsa -pubout -in private_key.pem -out public_key.pem
Now we are able to generate JWT and sign data with our private key in the, for example, next way:
public static String generateJWT(String userName) throws Exception {

    Map<String, Object> claimMap = new HashMap<>();
    claimMap.put("iss", "https://kostenko.org");
    claimMap.put("sub", "jwt-rbac");
    claimMap.put("exp", currentTimeInSecs + 300)
    claimMap.put("iat", currentTimeInSecs);
    claimMap.put("auth_time", currentTimeInSecs);
    claimMap.put("jti", UUID.randomUUID().toString());
    claimMap.put("upn", "UPN");
    claimMap.put("groups", Arrays.asList("user"));
    claimMap.put("raw_token", UUID.randomUUID().toString());
    claimMap.put("user_bane", userName);

    return Jwt.claims(claimMap).jws().signatureKeyId("META-INF/private_key.pem").sign(readPrivateKey("META-INF/private_key.pem"));
}
For additional information about JWT structure, please refer https://jwt.io
Time to review our application security stuff:
@RequestScoped - It is not about security as well. But as JWT is request scoped we need this one to work correctly;
@PermitAll - Specifies that all security roles are allowed to invoke the specified method;
@RolesAllowed("user") - Specifies the list of roles permitted to access method;
@Claim("user_name") - Allows us inject provided by JWT field;
To configure JWT in your application.properties, please add
quarkus.smallrye-jwt.enabled=true
mp.jwt.verify.publickey.location=META-INF/public_key.pem
mp.jwt.verify.issuer=https://kostenko.org

# quarkus.log.console.enable=true
# quarkus.log.category."io.quarkus.smallrye.jwt".level=TRACE
# quarkus.log.category."io.undertow.request.security".level=TRACE
And actually that is it, - if you try to reach /user/current service without or with bad JWT token in the Authorization header - you will get HTTP 401 Unauthorized error.
curl example:
curl -X GET "http://localhost:8080/user/current" -H "accept: application/json" -H "Authorization: Bearer eyJraWQiOiJNRVRBLUlORi9wcml2YXRlX2tleS5wZW0iLCJ0eXAiOiJKV1QiLCJhbGciOiJSUzI1NiJ9.eyJzdWIiOiJqd3QtcmJhYyIsInVwbiI6IlVQTiIsInJhd190b2tlbiI6IjQwOWY3MzVkLTQyMmItNDI2NC1iN2UyLTc1YTk0OGFjMTg3MyIsInVzZXJfbmFtZSI6InNlcmdpaSIsImF1dGhfdGltZSI6MTU4MjE5NzM5OSwiaXNzIjoiaHR0cHM6Ly9rb3N0ZW5rby5vcmciLCJncm91cHMiOlsidXNlciJdLCJleHAiOjkyMjMzNzIwMzY4NTQ3NzU4MDcsImlhdCI6MTU4MjE5NzM5OSwianRpIjoiMzNlMGMwZjItMmU0Yi00YTczLWJkNDItNDAzNWQ4NTYzODdlIn0.QteseKKwnYJWyj8ccbI1FuHBgWOk98PJuN0LU1vnYO69SYiuPF0d9VFbBada46N_kXIgzw7btIc4zvHKXVXL5Uh3IO2v1lnw0I_2Seov1hXnzvB89SAcFr61XCtE-w4hYWAOaWlkdTAmpMSUt9wHtjc0MwvI_qSBD3ol_VEoPv5l3_W2NJ2YBnqkY8w68c8txL1TnoJOMtJWB-Rpzy0XrtiO7HltFAz-Gm3spMlB3FEjnmj8-LvMmoZ3CKIybKO0U-bajWLPZ6JMJYtp3HdlpsiXNmv5QdIq1yY7uOPIKDNnPohWCgOhFVW-bVv9m-LErc_s45bIB9djwe13jFTbNg"
Source code of described sample application available on GitHub